Thursday, August 13, 2015
Sunday, July 26, 2015
Wednesday, July 23, 2014
Sunday, August 11, 2013
Friday, August 2, 2013
Monday, July 15, 2013
Rebuilt rear end
I took the Jeep to J&S Gears in Huntington Beach last week to get the rear axle refurbished. I'd done a drain and reseal on the front and rear diffs before camping, but when I got to the campsite I noticed that the rear was leaking where the left axle tube joined up to the pumpkin. Not good. It wheeled fined for our light stress trails, even including the choppiness of Jacoby Canyon, but I don't like leaks and I don't like weak points, so it had to be fixed.
Here's the grease ball from a while back, before the leak got even worse. Note the plug weld holes on either side of the pumpkin that hold the axle tubes in place. Also, you can see the slight bend in it as the tubes at the wheel hubs are higher than they are at the differential housing (and this pic is from five years ago). Yikes. Never noticed it, but at least in my defense I can make a point of saying that I haven't driven it more than a few thousand miles between this pics and the "after" shot below.
 After shopping around online, I discovered the bad news that FSJ Dana 44s are in demand as a swap-in axle for smaller Jeeps and this are not cheap and often not local. Paying $750 for a used axle with 100K miles, give or take, is a waste of money, especially when I'd had to drive to Lancaster to get it, hoping that it'd be better than what I have. I also toyed with the idea of buying a Dana 44 with disc brakes from an Isuzu Rodeo (or Honda Passport) for $150, but I would have to transport it back here from NorCal, re-gear both axles to match, and convert from SAE to metric brake lines. And there's a chance the calipers wouldn't fit around the leaf springs without the lift blocks, which i have but don't want to be married to. So that would still run me in the high hundreds, cost-wise.
Here's the grease ball from a while back, before the leak got even worse. Note the plug weld holes on either side of the pumpkin that hold the axle tubes in place. Also, you can see the slight bend in it as the tubes at the wheel hubs are higher than they are at the differential housing (and this pic is from five years ago). Yikes. Never noticed it, but at least in my defense I can make a point of saying that I haven't driven it more than a few thousand miles between this pics and the "after" shot below.

For about that same price as either of those two,options, J&S stripped mine down, replaced all the bearings, ground out the old plug welds, straightened the housing, put it in a jig to assure alignment, welded it up, sealed it tight, and re-installed it. This might as well be a new axle. I'm pleased, if poorer, with the axle, and I have faith it will hold up to the moderate wheeling I will put the rig through. This was a classic example of how money spent on experienced labor rather than new-to-me parts can often be the best way to go.
And now the finished product. Note the lack of gapping plug weld holes and the dead-straightness of the tubes. This will last me quite some time unless I abuse it like the DSPO clearly did.

And now the finished product. Note the lack of gapping plug weld holes and the dead-straightness of the tubes. This will last me quite some time unless I abuse it like the DSPO clearly did.

Sunday, July 7, 2013
A bit more lift
One of the discoveries I made on the wheeling trip around Big Bear (especially on Jacoby Canyon, the roughest of the trails we traversed) was tire rubbing. I knew that I was pushing it with 32" BFG's on only four inches of lift (five really with the body lift), so I needed to get a little more vertical so that I have better articulation without body contact.
Rather than throwing money at new springs front and rear, I went with a simpler and cheaper approach. I went with 2" lift blocks from Rusty's Off Road in the rear (real solid cast iron blocks with new u-bolts) and a 1" shackle lift in the front. No blocks in the front (only morons do that), but out back they are plenty safe if you exercise a few moments of thought and precaution. First, new and heavy blocks are better in every way than used and/or aluminum blocks. Get them from a reputable source like Rusty's, and get them for your specific axle and vehicle so that they help keep the pinion angle in the right ballpark, at least. These get the job done right:


 Just as before, if you follow the bedliner body line, you'll see how the tire before were slightly higher, while the "after" image shows how it's now even with the body line.

Rather than throwing money at new springs front and rear, I went with a simpler and cheaper approach. I went with 2" lift blocks from Rusty's Off Road in the rear (real solid cast iron blocks with new u-bolts) and a 1" shackle lift in the front. No blocks in the front (only morons do that), but out back they are plenty safe if you exercise a few moments of thought and precaution. First, new and heavy blocks are better in every way than used and/or aluminum blocks. Get them from a reputable source like Rusty's, and get them for your specific axle and vehicle so that they help keep the pinion angle in the right ballpark, at least. These get the job done right:

Installed:

The front shackles are a different matter altogether. I've heard of some Ford rigs coming from the factory with four or even six inch blocks in the rear, which seems nutso to me. The shackles, however, can only go so long. In order to get a 1" lift, the newer shackles have to be several inches longer than stock, and with that length comes a need for thicker/heavier gauge materials. Here are the new ones compared to the old ones:


The old:

The new:

It took a bit of finagling to get both blocks and shackles installed, requiring some BFH persuasion, but all in all, an hour or so from start to finish. Here's a pair of shorts, before and after in the back. If you following the body line of bedliner, you can see how much of a lift there is:


Before and after in the front:


Wednesday, July 3, 2013
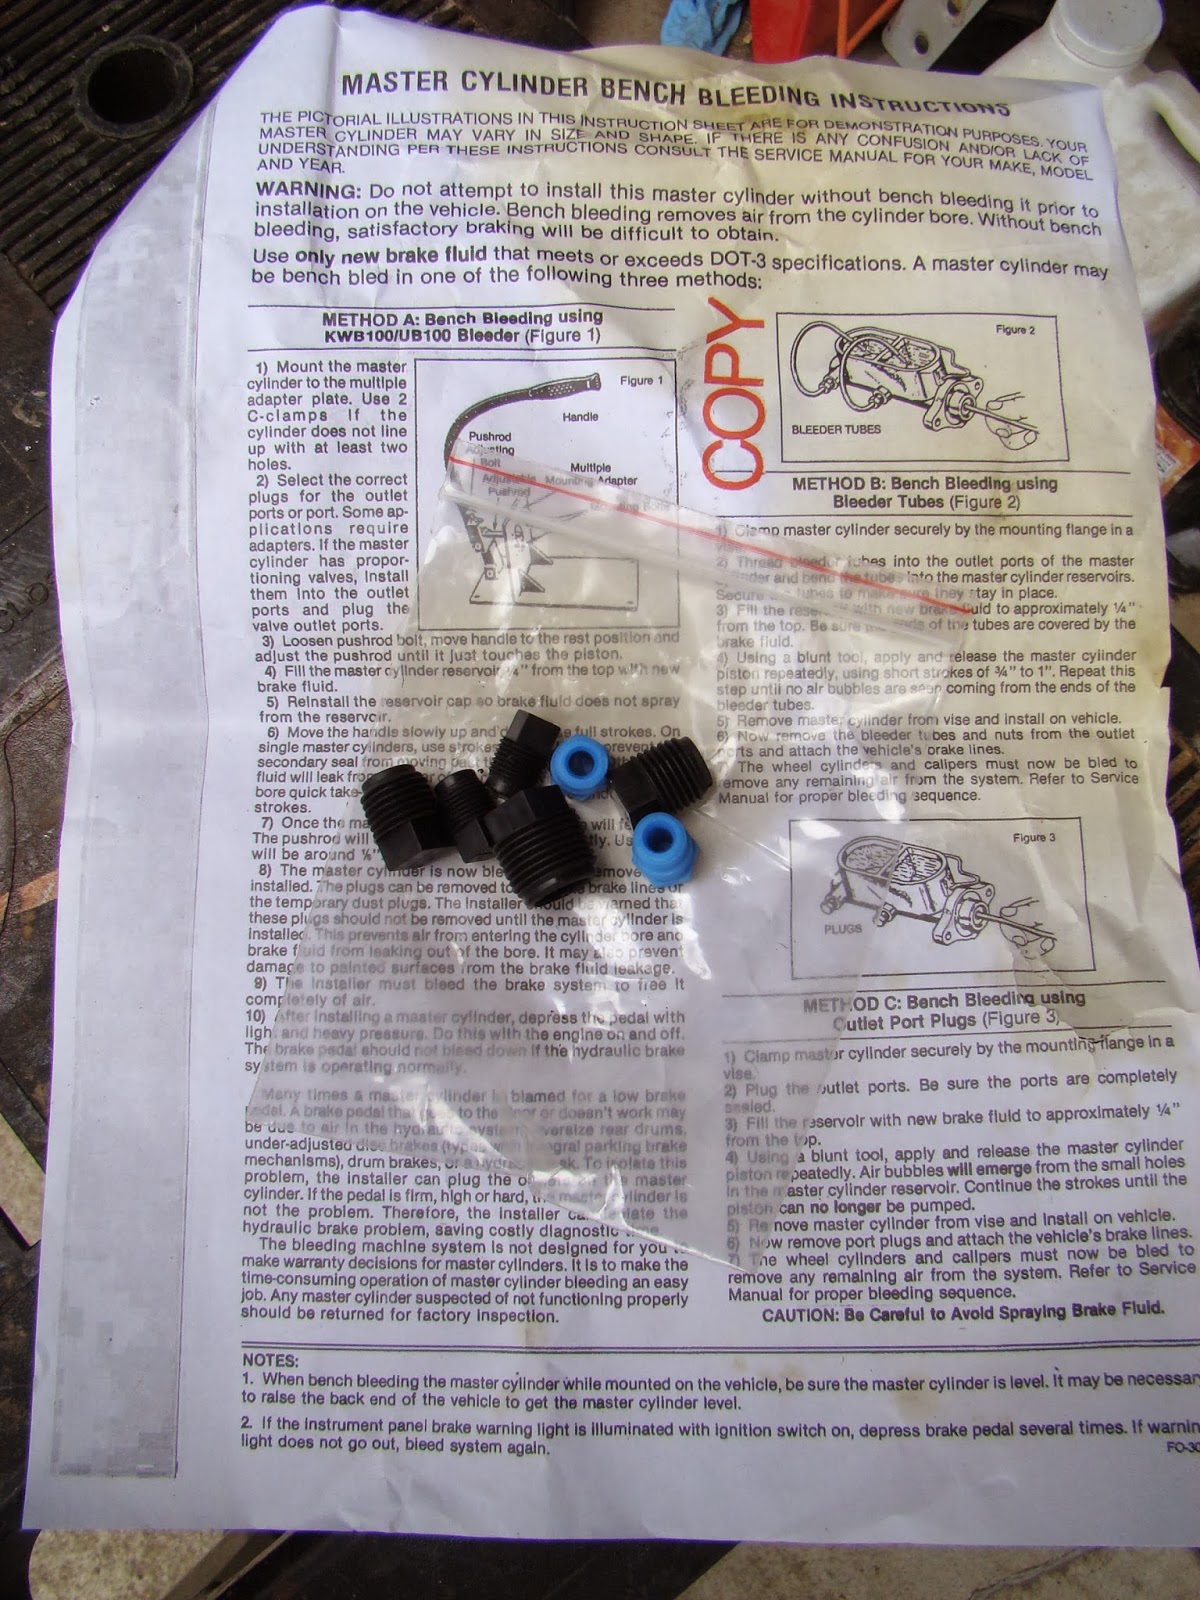
Master cylinder install and radiator burping
The master cylinder has a leak. You can see where the fluid has been eeking its way around the piston and out into the engine bay and the vacuum booster.


Tuesday, July 2, 2013
Sunday, June 30, 2013
Monday, June 24, 2013
Clear coat done
TouchUp Direct (the supplier of the base coat) notes on its website that the best way to get the true factory color is to cover the base coat with a clear coat. I did not do this pre-Big Bear partly due to time and partly due to my perhaps erroneous belief that keeping the base coat as the top coat would make touch ups easier. What I didn't process at the time, I didn't process how quick and cheap it would be to paint the rig in clear coat. So I headed over to my favorite auto parts store (Amazon.com) and ordered a six pack of these:
 I did a down-and-dirty mask of the vehicle using what was left of the tape and brown paper from the base coat paint job. Honestly, if I got a little clear lacquer on any of the unmasked areas, I wasn't going to care. I had to keep telling myself that this was a $300 paint job tip to tail, base and clear and equipment, and my target was "good enough" rather than "good." Just like on all my woodworking projects (furniture, instruments, and the like), I will always see every blemish no matter how good the item looks to others.
 I thought it was going to take me all day, with several hours between coats (which is how it was when I applied nitrocellulose lacquer to an old Silvertone guitar I was restoring). But upon reading the directions, I learned that it was about ten minutes between coats. What that meant, in actuality, was constant painting. It took about one full can to do half the Jeep. I started on the left side of the hood and valance, worked my way down the side, and finished up on tailgate. I then grabbed a second can, shook it for a while, started on the tailgate, and worked my way up to the passenger side hood and valance. By the time I was done doing that, the front left was dry and I could start over again. Basically, it was an hour of constant painting, and my right index finger went numb.
Side note: as I was masking up the rig again, I just didn't feel like doing a great job on it, obviously, but I also had a revelation. If I paint the faded taillight housings, I might be able to get them to look a bit better, if not be any better. Here's what they looked like before:
 And now after. A little fresher and cleaner, which is nice.


 I am quite pleased with the color and the consistency of the clear coat. It did indeed darker just a bit and better match the original color. At times, it looked blotchy just like the base coat did, but the top coat evened out nicely. A good day's work.


Side note: as I was masking up the rig again, I just didn't feel like doing a great job on it, obviously, but I also had a revelation. If I paint the faded taillight housings, I might be able to get them to look a bit better, if not be any better. Here's what they looked like before:


Done, but not quite buttoned up yet. A few pieces to put back on.


Friday, June 21, 2013
Limped home, and needing some service
To get down the mountain, I decided to go the east route that drops down to Mentone rather than the west route to Redlands. My theory was that it was longer and flatter to go east, so I'd avoid an overheat event. I was mostly right. I made it through Big Bear City and partway up over the pass (about 7500 ft) before the temp spiked and I had to pull over into a turnout for a cooldown and refill. The family was in the Honda about ten minutes behind me getting donuts. They brought me mine and some water for the Jeep. After a bit, I said screw it and got going. Sitting was going to cool it down more slowly than getting it up to speed on a downhill slope with the water pump running. It worked all the way through Mentone and east Redlands to the 10 freeway. I was flying through some quite beautiful mountain scenery. I found Clark's path and a few others that I will want to run sometime in the future. Sometimes I just put the rig in neutral to drop the revs and let the Jeep rest. Except for one massive RV pulling a TJ when I wanted to keep cruising, it was what I had hoped it would be. Kim said I was going so fast that she couldn't catch me on the 10 unless she went 75. But she's a slow mountain driver (doesn't do it at all during ski season), so she was just being appropriately cautious.
And then I hit the fan at Mission Ave and the 91. Yuck. I pulled off and let it sit. The family and I drove to Napa to get a megafuse for the fan in case it happened to be the problem (it wasn't, but now I have a spare). Popped it in. Fan wouldn't start.
We headed out towards the 60 because the 91 is the work of the devil and it was a warm inland empire summer day. I pushed it through Norco, got onto the 91 West for home and just kept going. Somewhere on this leg the temp gauge flat out died after I tried once more the "tap it to get an accurate reading" trick. My only gauge now would be steam or fire from under the hood. I blasted up Imperial Highway to Lakeview, on to my lovely block, up the lawn and home. I opened the hood to release any heat trapped in the engine bay.
For now, the rig is at peace and where I can work on it. Tomorrow will be better.
Monday, June 17, 2013
Saturday, June 15, 2013
Reassembly
Didn't take any pics of me putting stuff back on. Not interesting. These are just the glamour shots.


Friday, June 14, 2013
Painting, Day 2 - Bedliner
The roof is one lumpy chunk of sheet metal. It's sun damaged, dented, faded, peeling, with a bit of surface rust. I removed the luggage rack runners.


I went with Herculiner, which got good reviews and wasn't terribly expensive. I'm using it to add both a bit of style and a bit of protection.

The green tape marked off the section to be lined. I wanted to follow the body line of the doors, so I just carried it into the front fascia area.


Subscribe to:
Posts (Atom)