Monday, March 25, 2013

Installing Side steps

I've got wee ones--three--plus a perfect five foot wife.  A tall rig causes accessibility issues that have been building for years. I'd looked at getting some rock sliders from BJ'S Off Road, inverted to tuck not quite so high up into the door rockers.  I would have loved to have had them, but they were cost prohibitive (not that BJ's overpriced them, just that they were more, with shipping, than I could reasonably afford).

There are no bolt-on steps for these idiosyncratic vehicles, despite their long run from 1963 to 1991.  After doing a bit of searching on Amazon, I found a step that I thought might work, so I ordered one (I'd eventually need four, one for each door).

It wasn't a perfect fit, and there were some installation issues that I'll point out below; however, they do the job and look right, so I'm pleased.
They screw into the vertical back of the lower rocker panel (where the open-backed square portion of the bracket is) and then bolt through the rocker seam and up into the bottom of that same square bracket.  In the picture below, you can see the silver heads of the bolts.
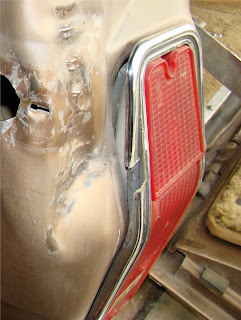
The above picture of the step for the driver's side rear door also highlights the primary installation difficulty: the frame rail and front spring perch for the rear leafs.  It's a tight fit to get a drill in there to screw a pilot hole and then get the screw itself in there.  I had to do it at a steep angle and work hard at it for quite some time to get it in there.  It was a real pain.  This was the first one I installed, and if I had to do it again, it'd be the second or the third so that I wouldn't have to learn not only how to install the step but also how to do it in the hardest spot.  It alone took me as long as the other three.  Additionally, note the stamped L-bracket in the upper right corner of the picture that joins the Jeep's flood to the rocker panel.  I used that as a point of reference to get both rear door steps aligned in parallel with one another.

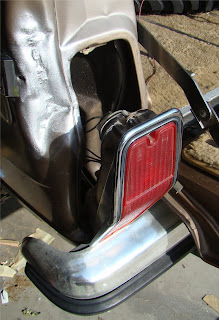
Here's the front passenger side step mounted up.  This shot shows another bracket that connects the Jeep floor to rocker panel.  It also worked nicely as a point of alignment for the two front steps.  These were considerably easier to install, though the frame rail on the left was still a bit of a bugaboo.
They aren't aesthetically perfect, sticking out a little more I had expected, but they work well for the kids and wife, which is great..

Saturday, March 9, 2013

Getting the cargo area squared away

I didn't want anything flopping around when the rig is taken off road, so I had to get the spare and the winch more properly secured.  A drill, some bolts, and a few little tricks got the job done.

I bought new on eBay the Mile Marker 2" receiver hitch winch mount (P/N 60-06495) that would let me use the recovery tool front or rear, given that I'd had Jeeps R Us weld a receiver hitch to the front frame cross member under the radiator (parts and labor, $450).
All in all, it weighs one hundred plus pounds, so I'm hoping not to have to lug it around much.  But I'd rather have that weight in the back of the Jeep over the rear axle than hanging off the front, messing with air flow to the radiator, as well as departure angles.  I also didn't have to buy a gigantor bumper and pay to have it shipped, so I'm good with that, too.
To get the winch mount secured in the back of the Jeep, I bought an RV bumper adapter that is designed to hold a spare tire holder that bolts to a 2" receiver mount.  To make it work for my purpose, I tossed aside the extra long grade 5 bolts and bought 2" grade 8 bolts from the local home center.  The adapter tucks up behind the passenger side of the back seat, away from fuel lines and the gas tank.  At an angle, the winch mount slides in under the hi-lift jack to stay secure and out of the way.
While I was working around in the back, I added two eye bolts to hook a tie-down strap to, holding the spare tire to the hi-lift jack.  It gives me some free space underneath to put my winch recovery bag, some tools, and a five gallon bucket of spare parts, hoses, etc.
All neat and tidy.
I imagine at some point I'm going to want to get the spare out of the rear cargo area, so when that happens, I'll either upgrade the rear bumper to a custom one with a swing out tire carrier (which would be a thousand bucks shipped) or keep it in the garage when I'm not wheeling (using the stock spare under floor above the rear axle as an emergency "mini" spare), and just throw it up on the roof for wheeling trips.

Friday, December 7, 2012

MSD install goes to hell, and the Jeep goes to the shop

I've been frustrated routinely and repeatedly with the ignition system in these things.  All that V8 goodness (in what is considered a pretty good package by AMC, even if it doesn't get the respect it deserves) is stifled too often by weak spark or no spark.  The cheap ignition module sucks.  The stock distributor cap contact points are a bit too close together, sometimes leading to spark overlap.  The ignition modules can burn out (as happened to me when I was hoping to take the family wheeling in Joshua Tree a few years ago).  Frustrating.

So one recommendation from the good folks at IFSJA.org was to ditch the stock ignition module and go with a MSD box.  I bought one off of Amazon.com, including the adapter plug to get it to mate with my stock distributor.  The coil was good, so this seemed like a good idea.
What a disaster.
I mounted the box on the driver's side near the charcoal canister and cruise control box.  It fit easily and allowed across the engine access to battery, the coil, and the distributor.
Unfortunately, I just can't get the dang thing to run.  I've got it hooked up right (I think), and I'm getting spark when I do the bolt-in-the-plug-wire test against the inner fender.  But when it is all plugged in and ready to go, I'm getting backfires out the carb.  Timing is off.
I bought a timing light, but it's too cheap to be of much use.  A waste of money.  I tried rotating the distributor a little in each direction, but this made no substantive change.  I'm having a hard time figuring out how timing could have jumped so far without the distributor moving.  The timing chain is an Edelbrock double roller and has maybe a thousand miles on it.  I'm sick of this.
It's been several days.  I was worried that maybe it wasn't getting fuel, so I tried to roll it down the hill from its parking spot beside the garage, but that was a disaster too.  It got caught up on a damned yucca at first, but eventually I got it in the street down in front of my neighbor Frank's house.  He's a good guy and doesn't mind at all.  Parked on his driveway is an old Chevy pickup with a camper shell.  It gets started up and revved high every few days to get it alive.  I'm not sure the hard revving is helping it, especially since it doesn't get driven much, but that's his business.

Now the transmission is leaking an insane amount.  What the hell is going on?  My Jeep is acting a bit geriatric: has no energy and can't control its bladder.

I'm going to have to give up on this for now.  I've called Jeeps R Us in Laguna.  They have a great reputation for getting old Jeeps running, even being featured in JP Magazine a few times.  There's even a gigantic Cherokee FSJ that they have named Matilda that is a running billboard for their skills.  I'm calling a tow truck, dropping this thing off, and throwing money at it (or out the window).  They'll get the tranny leak fixed and the starting issue resolved, I'm sure.

----------UPDATE------------

I got the Jeep back in mid-January '13 but forgot to add in a blog entry to mark the date.  The work was incredibly expensive, which irritates me for two reasons: 1) I didn't want to spend so much money just to get it running when it already had been; 2) Jeeps R Us was lousy in communicating the cost of the repair work for my approval.  I was just confronted with sticker shock when I got the call that the Jeep was ready.  The vast majority of the cost was labor alone, and I don't see how trained mechanics should struggle so much just getting a Jeep started when the engine's been rebuilt and the bulk of the ignition system parts were in perfectly fine operating condition (testified to by the fact that they did not need to be replaced).  They put in a new rotor for distributor and a new coil and adjusted the timing.  Seems like they could have been more efficient and effective with their time (which equals my money).  Hell, fixing the tranny leak was only a third of their labor bill.

On the plus side, they welded on a front Class Three receiver hitch using a factory hitch they had lying around the shop.  This wasn't expensive, comparatively.

Jeeps R Us got the job done, but I'm not impressed with their billing/estimate process or their communication, so I'll be looking elsewhere for future FSJ repair work.

Friday, July 20, 2012

Emergency Brake Cable

At the new house, my Jeep sits up on the side of the house at the top of a small hill.  There's a slight slope to the Jeep's landing pad.  I've never quite gotten the emergency brake cable set to how I like it; heck, even the brake shop that I took it to in Redlands couldn't get it adjusted satisfactorily.

My theory was that the cable itself was stretched to the point of ineffectiveness.  I ordered up a new one from BJ's and proceeded with the install.  I chocked the tires, made sure it was in park, and then started the tear down.  It was rather simple.  I just need to disengage the parking brake itself and remove the cable end from where it meets up with the pedal.

In this photo, you can see the cable tucked up in the corner.  The large black steel bar on the left is the foot-activated brake level arm.  The cable mounts up to the end of the level arm like a giant bike brake cable, and a squared C-clip holds the sleeve in place.  Pull it first to get a little slack, pop the C-clip, loosen the cable underneath the vehicle, and then slide the lead cylinder out of its pocket in the brake arm.  It's now free to be pulled out from underneath the rig.
The sleeve and cable housing slides up between the inner and outer driver's side fender wells.
It then slides through holes in the frame rail and the transmission cross member where it meets up with the U cable that runs from one drum brake to the other.
The threaded rod in the center of the pic below is at the end of the new brake cable, just under the rearward end of the front driveshaft.  This is where the adjustment takes place.  There's another on the passenger side.  You control how much tension pre-load is on the rear drums.  Not enough, and the e-brake doesn't fully engage and hold the vehicle in place.  Too much, and the brakes are always slightly on as you drive.  I figure it out entirely by trial and error.  Note: use the double-nuts to lock your adjustment  position in.

Thursday, August 18, 2011

Fuel hoses, part II

To my irritation, one of the return fuel lines was not hooked up when I picked up the rig from Hall's Engines in Moreno Valley.  It was an easy fix.  While I was in there, I replaced a few other rubber lines that looked old.  I like fresh rubber, especially considering the wide variety of dry rot my 1973 VW Bug suffered from after sitting for a decade in the previous owner's garage.  When my dad and I swapped vehicles so that I could take his Nissan pickup truck on my honeymoon (to haul my and Mrs.'s bikes up to Mammoth Lakes), the Bug's right rear tire blew out, even though it had plenty of tread left.  The side wall shredded, scraping up the rear fender with all the exposed steel belting.  Not good.  Whenever I can, I replace old or suspect rubber with new, without question or second thought.  It ain't worth the possible hassle given the minimal cost.

Monday, May 2, 2011

Finally got the Jeep back on Friday!

After ten months at Hall's Engine in Moreno Valley, I was able to pick it up.  To my dissatisfaction, they were not, after all this time, able to get the transmission leak under control, so that's up to me to deal with later.  But they did manage to get it to pass smog, the least they could do given that they rebuilt the engine.

In hindsight, I should have done things a bit differently, perhaps finding a different builder or a less expensive one.  I get the feeling that after the rebuild was paid for, I was more an annoyance than a customer.  So it goes.  But we are moving in a few weeks to live at my parents' house in Carlsbad for a month before we can move into the new house in Yorba Linda, and now I got my Jeep back.

Monday, May 31, 2010

Working on the tailgate

Like many FSJ owners, I had tailgate window issues. It would make a lovely popping/grinding noise whenever I put the window up. In order to get it into position, I consistently had to grab the top of the window and pull it up at least halfway while engaging the key in the tailgate. Not fun, of course. I started by dropping the window and the tailgate. I ordered a tailgate channel from BJ's last week so that when I dove in, I'd have the materials I needed.
The first step is to drop the tailgate and remove the carpet and the access panel. Just take out the fourteen screws holding the chrome metal strips in place on the carpet, and then take off the twelve that hold the access panel. Stay organized, however, because these screws are at specific lengths to avoid hitting anything of the internal workings of the tailgate itself. Here's what I found. Notice on the left that the window is not sitting in the black lifter channel. That was a sign of more serious internal problems. Once I disengaged the safety killswitch on the driver's side of the tailgate, I was able to get the window up while the tailgate itself was down. This gave me better access to the window mechanism.
Reaching my arm in on the driver's side, I was able to feel around a bit and discover that the end of the lifter channel was not in the slot that extends the length of the tailgate. That slot is what keeps the channel in place during its up and down movements. It also makes sure that the window itself is in alignment when it slides up into the body and the roof line.
In the pic below, notice the two large gears with the 1 1/4" flatstock steel bars. As the motor rotates the driver's side gear, it moves the flat bars which are attached to the lifter channel via small bolts and a pair of spring-loaded washers.
Here's a shot of the passenger side where the lifter channel meets up with the flat steel bar. The arrow is pointing to the washers that slide in a slot (just above and extended to the right of the arrow itself). That's what it should look like.
Here's the driver's side. Not quite right. Notice the lifter bar is to the left of the slot that the bolt should ride in (see the red arrow). I was able to discern that the top washer had popped off, which in turn made the bolt disengage from the lifter channel slot. After a bit of rearranging of the internals, I was able to get the lifter channel above and to the left of the lifter bar, exposing the bolt that should have been in the slot. (Are you following any of this?) Once I had somewhat clear access to it, I went at it with my sawzall and long blade. The only tricky part was when I had to use my fingers to align the blade with the bolt. Needless to say, I kept my other hand quite clear of the trigger, just in case.
I was able to cut the bolt flush with the steel bar, but the remaining portion of the bolt still refused to dislodge. My only recourse was to drill through the tailgate wall just above the bolt and then drill out the bolt. On my first attempt, I was a little high so I had to drill a second access hole. I'm sure there are more elegant and less invasive solutions, but I wasn't having them. In this pic, as well, you cansee the slot that bolt rides in (to the left of the drill bit).
Digging through some old hardware, I came up with this pile. The brass flared washer is the key. It fits perfectly in the slot and will alow it to slide. The bolt itself is an allan head, which allows me to hold it in place more easily than if I a regular hex head bolt. A few regular washers round out the kit.
Once the bolt and washers were in place, I hit it with the grease gun and almost immediately had better sliding action, but the window still didn't work as I well as I wanted it to. The grinding noise during upward motion remained, so I dropped the tailgate and investigated further. This is what I discovered.
Where I'm pointing here with the screwdriver is the motor gear, which rotates the larger of the main gears, which in turn rotates the smaller one at the top of the pic, lifting the window. The plate on which the motor gear was mounted (below the two main gears) was deflecting to the point that the motor gear itself was not fully engaged with the larger lifter gear. My "what do I have nearby that will fit" solution was simple: two strips of 3/8"x2"x12" plywood wedged between the motor (electrical, so the wood won't hurt it) and the outside wall of the tailgate. This pushed the plate towards the lifter gears by about 3/8". I also took the time to clean out the lifter channel where the window had separated from it, then added some black silicon adhesive to hold it in. After cycling the window up and down a few times to fully seat the window in the channel slot, it was good to go.
I added little green grease, and now I'm done. After buttoning the tailgate back up, I had a fully compliant tailgate window. I think when I'm bored and in the mood for some quick little project, I'll open the tailgate back up and glue the plywood strips together and use some silicon adhesive to hold the plywood to the tailgate wall.

Sunday, May 23, 2010

Another run to El Mirage

Here are some videos of the kids behind the wheel at El Mirage OHV. Just click on a name to watch the video from my Photobucket account. They're each one or two minutes long but quite fun and funny. Pay particular attention to the background to get a sense of their turns and speed.


Friday, May 21, 2010

New exhaust system

When the engine was getting rebuilt at Hall's, Greg noticed that the catalytic converter wasn't heating up, which means it isn't functioning correctly. (A cat needs to get to at least 600 degrees to really work well in terms of emissions control, though they can run as hot as 1500 degrees without damage.) Unfortunately, excess heat can lead to other interesting side effects. Here's what I found when I peeked into my old converter.
Not exactly an effective set up. I'm kind of amazed that the thing passed emissions with this. How bad does one of these have to be to fail?
My new Magnaflow cat from BJ's is a great replacement for the original one. It's CARB legal, which is a requirement here in California. I know this thing is old and sucks gas, but I still want to have a clean running rig.
Since a converter change was necessary, I decided to go whole hog. Earlier this year, I'd noticed just how truly lousy the welds were at the joints of the exhaust system, including the AIR return tube from the cat back to the exhaust manifolds. Here's the 3"-to-2 1/2" neckdown transition from the Y-pipe to the cat. Ugly. I have a more elegant, or at least less messy, solution that I put into practice today on the other side of the cat, which I'll get to later. This one stays for now, however, because I will be having Hall's put on a pair of Doug Thorley headers with a 3" Y-pipe, which means this junk will be going bye-bye then.
Here's my muffler, which I've come to understand is not stock/OEM. This one is quite long (~30") and looks to be a no-name brand. For better or worse, from the cat back this thing was one big welded chunk, so I had to remove it first.
First I popped it off the cat. Luckily, it wasn't welded up, just a normal exhaust clamp. Before I went to work on the door lock fix this morning, I hit the nuts with penetrating lube to soften the rust up a bit. It worked well.
Then I had to get it off the hanger clamps at the back end. Here's my son, Nath, helping me get the job done. He's a lot of fun, of course, and he knows his way around tools enough to get me the sockets or wrenches I need. When I'm stuck under the Jeep, he's the best helper there is. (Note, as well, the kinks in the exhaust pipe and the broken weld tabs out by the exhaust tip--this thing was never a quality product.)
Because it's one chunk and I didn't feel like going to town on it with my Sawzall, I worked it forward, rotating the tailpipe over the rear axle and then pulling it out under the driver's side door. Easy. The cat also was simple to remove, again just an exhaust clamp holding it in place.
Then it was time to get with the installation. Unfortunately, the neckdown transition pieces I ordered from Amazon.com were 3" inside diameter rather than outside diameter. That meant they wouldn't slip inside the muffler and catalytic converter tubes as I had hoped. Instead, they were the exact same dimensions as those tubes so I needed to get some 3" o.d. and 2 1/2" o.d. exhaust pipe to get the job done. I went to O'Reilly's with Nath but had no luck. The counter guy there steered me to Redlands Muffler & Brake. My plan was to buy some pipe. The owner of the shop was just hanging out when I came in. He and one of his employees dug through their cutoffs and pulled out two pieces of the right diameter. When I asked how much, he said free. It's nice to meet people like this. He didn't need the scraps he gave me, and he didn't need to charge me either. A good man. My neckdown transition is the middle one in the pic below. On its flanks are the scrap pipes he gave me.
First thing I had to do was cut them to the right size, so I laid out the kit I bought from BJ's Off-Road side by side with the old muffler (sorry, no pics) to get a sense of the length difference, which was about eight inches, the length of my pipe adapter. With my dremel, I cleaned up the edges of the scrap pipe and then popped them into the adapter before cutting them down. Here's what I had at that point.
Once I knew the length I needed, I scribed a line, put the pipe in my woodworking vice (only one I got, for now), and then went at it with my Sawzall. Here's what I produced. I cleaned the edges of the cutoffs again with my dremel. I have the parts to build a second one to replace that welded up junk mentioned earlier. When I deliver the rig to Hall's for the headers, I'll drop that off, as well. Hopefully it won't make the system as a whole too long. If so, they'll have to fab something up.
Once I could put the system together, I threw on the cat and tightened down the exhaust clamp finger tight so that I could move it around as needed. Then I slipped on my new adapter pipe and the muffler. The weight of the muffler was causing everything to hang down way too far below the frame rail, so I used my jack to get it back up into position. With the custom bent exhaust pipe from BJ's that is designed to get over my rear axle, I jacked everything up until the muffler was level and I had good clearance at the back end.
I was able to reuse my existing hangers, which was nice. This one I'd put on about a year and a half ago because the old system knocked against the track bar extension bracket (in pic at left). I think I'll go back under there soon and lop off the inch or so of bolt sticking out to the right of the bracket housing on the axle, just for the extra clearance.
3" pipe meets for 4" chromed exhaust tip. Again, I was able to reuse the hanger that worked with the old system. I just had to rotate it a bit since this pipe goes a few inches farther back than the old one.
Here's my 3"-to-2 1/2" adapter in action. I could pay to have this all welded up, but I like the flexibility of the clamps for now, especially with the Thorley headers going on soon. There might be some fitment/length issues that will need to be accounted for when all is said and done. That band clamp works quite well, and the other two clamps are positioned perpendicular to each other so that the nuts are easier to loosen or tighten.
The entire thing, tucked up snug. It sounds great. Not terribly loud, but a nice, deep rumble. I'm sure it's going to be great. And with the headers on, I might even get a bit more power and efficiency out of the engine. One can hope...

Swapped door locks

This morning I switched out the door locks from the driver's side and the passenger's side. The driver's side was in poor shape with the little parts where the key enters the mechanism moving around, so I pulled the retaining clips on both doors (in the far right pic), popped out the lock mechanisms, and traded them. The passenger side, since it isn't used much, was in quite good condition. While each was out, I put a little black silicon around the bezel to seal it up since the original plastic seals were shot. It was an easy fix.

Friday, May 14, 2010

Transmission pan leak and fix, round two

Didn't work with a cork gasket. I think the pan in the passenger rear corner is warped. I tried it again, draining and saving the freshly installed fluids. I added a rubber gasket plus some special Permatex RTV for transmissions. (NEVER use normal RTV on a transmission gasket because it will be dissolved by additives in the transmission oil.)
Still didn't work. I'll pull it again and hammer on the pan to try to true it up. We'll see.
For what it's worth, I'm not frustrated much by this. With the drain plug in place, it's much easier to repeatedly drop the pan as I try to get the leak fixed. I'm gettin' real good at it.

Monday, May 10, 2010

Transmission pan leak and fix

My transmission pan has been leaking way too much from the passenger side, especially since it's been sitting. Hall's offered to fix it, but I wanted to take care of it both to save the labor cost and to install a drain hole. Without a drain hole, here's how I normally have to get the oil out of the pan.
Not pretty. It just dumps out, and I hope the drain bucket catches it all. To affect change, I drilled a 1/2" hole with my nifty new drill press set to 600RPMs (slow and steady for drilling metal). It wasn't quite the right fit, so I widened it a bit. The way the drain hole adapter works is fairly simple. It's a large threaded bolt that goes through the drilled hole into the pan. A nut holds it in place, with a teflon washer on the outside for sealing. The inside of the large bolt is threaded as well, and a smaller bolt goes into that. Here's where I decided to put the hole:
This is a shot of it from the outside. Note the teflon washer. I located the hole in the front driver's side corner because I felt that area had the most clearance away from the transmission internals.
With the smaller bolt plug in place. In the upper right of the pic, note the front drive shaft.
It was a fun little project. I'd had the drain plug adapter for about a year in a box, so it was nice to finally be able to put it on.

Friday, May 7, 2010

Ran out of gas yesterday!

No pics in this one, just shame.

Background: the fuel gauge is shorting out on me (I think), so it always shows full. I'd only driven 80 miles since the last fill-up (Feb. '09), but I'd idled it quite a bit when working on the radiator and electric fan, so I must've burned through a good chunk of the tank.
Anyway...
Driving to work Thursday morning, left early to give the Jeep an easy go of it, never going above sixty. Halfway there, and it starts to stutter, fades, and then dies. My first thought is pure shock because the wiring harness and the engine rebuild were supposed to cure this kind of random engine death. But thanks to my clear fuel filter up near the carb, I was able to figure out that no fuel was flowing. Just needs some gas, so I'll ring up my wife and have her bring me some.
Of course, no cell phone.
And since I usually carry a few gallons of spare gas, the jug is sitting in the back, empty.
The Perfect Storm.
I'm evenly spaced between two freeway exits, and I cannot see nor remember where the nearest station is. So I wait.
Ten minutes later (roughly 8:15), as my karma turns, a truck for the Riverside County Transportation Commission's Freeway Service Patrol pulls up, gives me a gallon for free (no AAA required), squirts some starter fluid in the carb as I start it up, and then bids me on my way with a handshake.
I filled up at the next exit and made it to my class on time.
My Jeep rocks, the engine rolls, and I'm an occasional idiot.

Wednesday, May 5, 2010

Picked up the Jeep today!

I finally got to drive it home today, followed by the family in the Honda. It cruises quite nicely at 60ish, running about 2300 RPMs. The gas gauge is permanently pegged to F, so I'll have to get at that soon. Honestly, I couldn't help but smile as I was driving home. But since it now runs a bit quieter, every time I let my foot off the gas and the engine RPMs dropped, I had a momentary flash of anxiety that it was dying again. I was wrong every time, but this new, quieter and more reliable engine will take some getting used to.
I'll be driving it to work everyday for the next few weeks to get some miles on it and check the reliability of not so much the rebuilt engine but the wiring upgrades I've performed lately. All in all, I expect good things.
Here's the parts list breakdown, totalling $915.27:
  • Fel Pro KS20001 Gasket Kit #FS8266PT4
  • Fal Pro Valley Pan Gasket #96001
  • Sealed Power Cam Kit #KC646
  • Sealed Power Piston Kit #W362NP
  • Sealed Power Rod Bearings #3310CPA
  • Sealed Power Lifters #HT2011
  • Sealed Power Main Bearing #5037M
  • Sealed Power Ring Set #301K
  • Sealed Power Brass Freeze Plugs #381-2170
  • Sealed Power #UK 17412 Hard
  • Stant Thermostat #13008
  • Oil Filter #61626
  • 7 Quarts of Oil
  • 1 Gallon Coolant
3 Year/Unlimited Miles Warranty

Wednesday, April 28, 2010

Rebuild update

I got a call from Greg at Hall's Engines today. Everything is going to plan except for one glitch: unfortunately, I bought the wrong shorty headers from Summit Racing (no AIR tubes, which means the engine would never pass smog with them installed). Instead, Greg will put the OEM exhaust manifolds back on, and then when I return in 500 miles or so for the engine checkup and oil change, he'll slap on the right headers (which I'll try to order today from BJ's Off-Road), take it to a local guy he knows to get it smog certified (tuned as needed to pass), and then get it back to me.

At any rate, it's a minor setback because the engine should be back in the Jeep tomorrow and ready for testing. I'm not sure if I'll be able to pick it up Friday before the family heads to Carlsbad or if it'll have to wait until Monday.
I've had nothing but positive interaction with Greg so far, and I'm still quite confident that I found the right guy to get the job done right the first time.

Tuesday, April 13, 2010

The engine rebuild begins ... but not by me

I dropped the Jeep off at Hall's Engine Rebuilding and Radiator Service in Moreno Valley this morning. It performed nicely on the freeway, but I'm sure I left a Hansel and Gretel trail of oil between our house and the engine shop since the rear main seal is leaking like a sieve. As I get updates from the shop, I'll post them here.

The plan right now is to tear the entire engine apart; get the block decked, honed, and bored; check the valves for undue wear and replace the springs; replace the cam, the pistons, and the rings will stock spec parts; machine the piston arms back to true and install new bearings; replace the oil pump, the water pump, the timing chain, and so on; and install all new gaskets, belts and hoses, of course.

I took in a few parts that I'd bought in advance:
· Edelbrock Short Headers for the AMC 360 V8 to replace the stock exhaust manifolds (I'm hoping to squeeze out a few more horsepower from this upgrade)
· Edelbrock Timing Chain set for AMC 360 V8 (it's a higher quality chain with roller bearings)
· Flow Kooler hi-flow aluminum water pump for AMC 360 V8 (30% higher flow over stock)
· New polyurethane motor mounts (1 pair)
They'll pull the engine and reinstall it, which they prefer to do to make sure the setup is right and to assume all control (and liability) for proper installation. Also, though I'd bought most of the necessary gaskets in advance, the owner of the shop advised me to let him purchase and install the gaskets (nearly all will be Fel-Pro) as an insurance policy for both of us. See, the engine, upon completion, will have a three year, unlimited mile warranty. But should one of the gaskets I provided prove to be faulty, there would be the potential for debate over who should pay (was it a gasket problem or an install problem, my fault or his?). If it's one of his gaskets, he's responsible for all parts and labor.

Also, another nice service Hall's provides is a free checkup after 500 miles. They'll do an oil change and check the engine over, including all connections, to make sure all is well. If something is wrong (problematic metal shavings in the oil, for example), they can address it before anything catastrophic happens.

All of the above is what sold me on using Hall's. In addition to that, however, is the fact that they specialize in off-road vehicles and enjoy working on older Jeeps (he was working on a V6 CJ5 when I pulled in this morning, and their site has some shots of a pair of desert flatties). While these Jeeps are not going to feature the AMC 360, they're mostly AMC vehicles, so he knows what peculiarities these rigs can have.

The complete rebuild, including all parts and labor (and removal and install of the engine) will be about $3600. He says they rarely go over an estimate and are quite off under. I left a 50% deposit to get the job rolling.

Saturday, April 10, 2010

Another taillight fix

I had to return to the left taillight again. I grabbed the housing off of that same 88 GW at the PAP in San Bernardino. I think I paid two bucks for it.
Remember what I started with (before the sidemarker fix), including the body damage. It's actually somewhat surprising that the taillight housing wasn't more damaged that this. Just that little one inch chunk missing. But my other concern, now that I had replaced the sidemarker light, I wanted to get the entire driver's side rear more waterproof than it was.
I had to pull the interior left panel in the cargo compartment to get at the two nuts holding the housing in place. Since the donor rig was already gutted back there, it was easy to see how it was attached, which made this job much easier on my rig.
The red taillight lens was slightly damaged, as well, so I took some time to get it glued up with some silicon adhesive, guaranteed to remain intact even when exposed to moisture and heat.
The taillight lens and housing back together, wired up, and ready to go. Before I put the lens in, however, I put some clear silicon in the housing grooves where the lens mates up. Again, water tight is the phrase of the day.
The real challenge was plugging the gap between the housing and the body panel since they were not and never would be, um, shall we say symmetrical. First, I cut up the rubber sole on an old running shoe. I shaped it like an L, as if it would fit between the top edge and outside edge of the taillight housing and the body panel. No go. Then I found some spare insulator tubing that I had leftover from when I installed my house's water heater a few years back (I get rid of very little until it truly resembles garbage). I flattened it against the outside and top edges, pushed the housing into the body panel, and tightened down the nuts. It's a great fit.